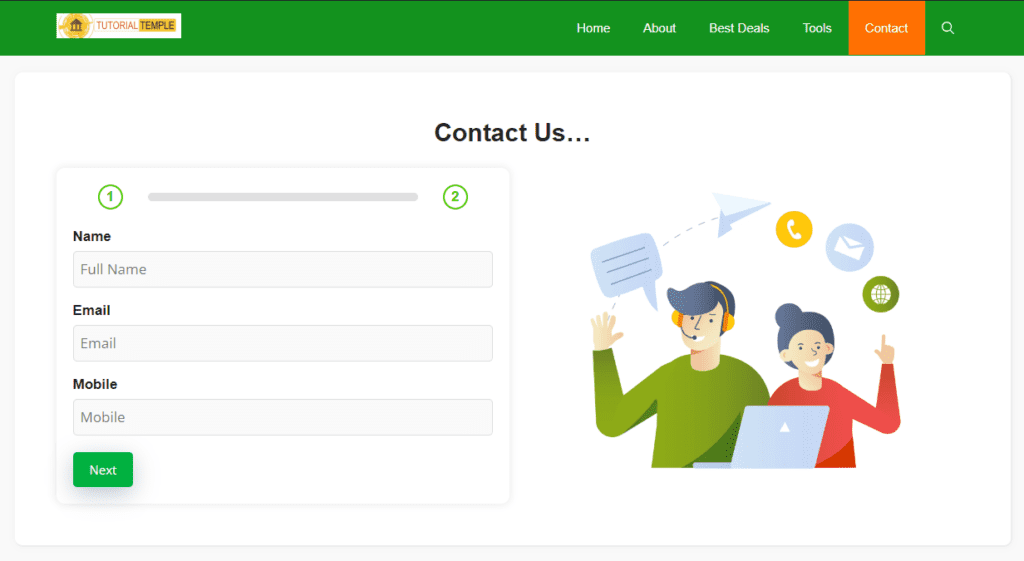
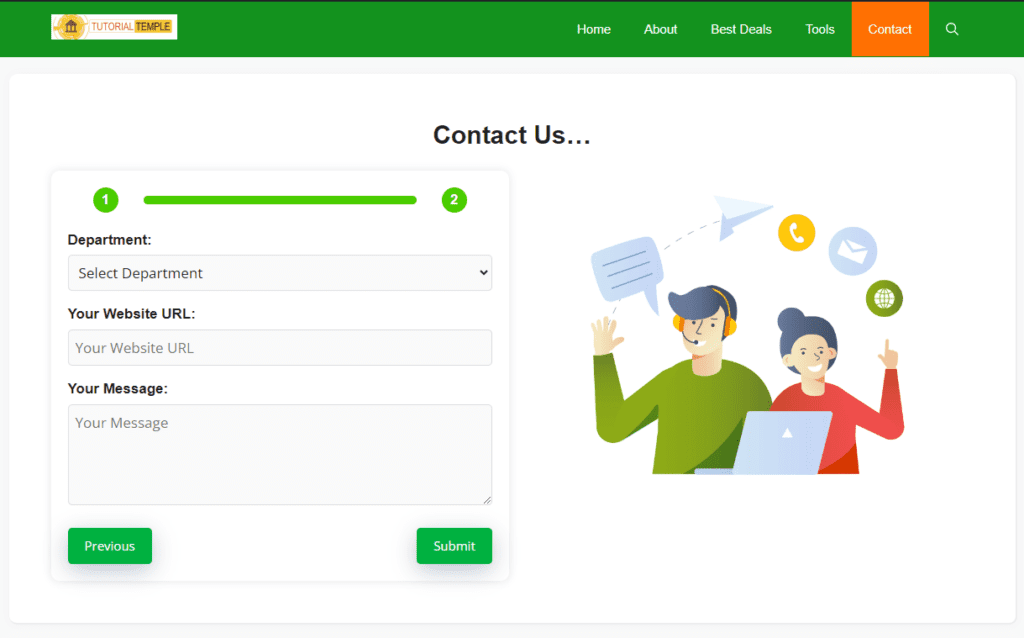
A well-designed contact page is crucial for any website. It not only helps your visitors get in touch with you but also provides a professional touch to your online presence. In this guide, we’ll walk you through the steps to create an effective contact page for your website.
📋Table of Contents
📢Why You Need a Contact Page ?
➤A contact page is essential for several reasons:
- Accessibility: It makes it easy for visitors to reach out to you.
- Trust: A clear contact page builds credibility.
- Engagement: It encourages user interaction and feedback.
📢Creating a Contact Page in WordPress
➤Here’s a step-by-step guide to creating a contact page using WordPress:
- Log in to your WordPress dashboard.
- Go to “Pages” > “Add New”.
- Title your page (e.g., “Contact Us”).
- Add a Custom HTML Block:
- If using the block editor, click on the ‘
+‘ button to add a new block and select “Custom HTML“.
- If using the block editor, click on the ‘
- Insert the given HTML code.
📢HTML Code:
<!DOCTYPE html>
<html lang="en">
<head>
<meta charset="UTF-8">
<meta name="viewport" content="width=device-width, initial-scale=1.0">
<title>Multi-Step Contact Form</title>
<style>
body {
font-family: Arial, sans-serif;
background-color: #f9f9f9;
margin: 0;
padding: 0;
}
.main-container {
display: flex;
flex-direction: column;
align-items: center;
justify-content: center;
}
.form-and-image-container {
display: flex;
flex-direction: column;
align-items: center;
max-width: 1200px;
width: 100%;
}
.form-container {
background-color: #fff;
padding: 20px;
border-radius: 10px;
box-shadow: 0 0 10px rgba(0, 0, 0, 0.1);
max-width: 600px;
width: 100%;
margin-bottom: 20px;
}
.form-step {
display: none;
}
.form-step.active {
display: block;
}
.form-group {
margin-bottom: 15px;
position: relative;
}
label {
display: block;
margin-bottom: 5px;
font-weight: bold;
}
input[type="text"], input[type="email"], input[type="url"], textarea, select {
width: 100%;
padding: 8px;
border: 1px solid #ddd;
border-radius: 5px;
box-sizing: border-box;
}
.form-navigation {
display: flex;
justify-content: space-between;
margin-top: 20px;
}
.btn {
padding: 10px 20px;
background-color: #007bff;
color: #fff;
border: none;
border-radius: 5px;
cursor: pointer;
}
.btn[disabled] {
background-color: #ccc;
}
.step-container {
display: flex;
align-items: center;
margin-bottom: 20px;
flex-wrap: wrap;
}
.step-indicator {
display: flex;
align-items: center;
margin-right: 20px;
margin-left: 20px;
}
.step {
width: 30px;
height: 30px;
border-radius: 50%;
border: 2px solid #4acd00;
display: flex;
justify-content: center;
align-items: center;
background-color: transparent;
color: #4acd00;
font-weight: bold;
margin-right: 10px;
margin-left: 10px;
}
.step.complete {
background-color: #4acd00;
color: #fff;
}
.progress-bar-container {
flex-grow: 1;
background-color: #e0e0e0;
border-radius: 5px;
height: 10px;
max-width: 100%;
}
.progress-bar {
height: 100%;
width: 0%;
background-color: #4acd00;
border-radius: 5px;
}
.error-message {
color: red;
font-size: 12px;
position: absolute;
bottom: -20px;
left: 0;
}
.contact-image {
width: 100%;
max-width: 500px;
height: auto;
margin-top: 20px;
order: -1; /* Ensures image is above the form in mobile view */
}
.heading {
margin-bottom: 20px;
text-align: center;
font-size: 30px;
font-weight: bold;
}
/* Modal Styles */
.modal {
display: none;
position: fixed;
z-index: 1000;
left: 0;
top: 0;
width: 100%;
height: 100%;
overflow: auto;
background-color: rgba(0, 0, 0, 0.5);
}
.modal-content {
background-color: #fff;
margin: 15% auto;
padding: 20px;
border-radius: 5px;
width: 80%;
max-width: 500px;
}
.close-button {
color: #aaa;
float: right;
font-size: 28px;
font-weight: bold;
}
.close-button:hover,
.close-button:focus {
color: black;
text-decoration: none;
cursor: pointer;
}
/* Common styles for tab and mobile views */
@media (max-width: 1024px) {
.form-and-image-container {
flex-direction: column; /* Stack form and image vertically */
align-items: center;
}
.contact-image {
order: -1; /* Ensures image is above the form */
margin-top: 0;
margin-bottom: 20px; /* Space between image and form */
width: 100%; /* Ensure image fits within container */
max-width: 500px; /* Set maximum width for larger devices */
}
.form-container {
max-width: 100%;
}
.form-navigation {
flex-direction: column;
align-items: stretch;
}
.btn {
width: 100%;
margin-bottom: 10px;
}
.step-container {
display: flex;
align-items: center;
justify-content: space-between;
margin-bottom: 10px;
}
.step-indicator {
flex: 0 0 auto;
}
.progress-bar-container {
flex-grow: 1;
height: 5px;
margin: 0 0px;
border-radius: 5px;
background-color: #e0e0e0;
}
.step {
width: 35px; /* Increase size for better visibility */
height: 35px;
font-size: 16px; /* Increase font size */
line-height: 1.5; /* Ensure vertical spacing is consistent */
margin: 0; /* Remove margin between steps */
}
}
/* Styles for larger screens */
@media (min-width: 1025px) {
.form-and-image-container {
flex-direction: row; /* Align form and image horizontally */
align-items: flex-start;
}
.form-container {
margin-bottom: 0;
margin-right: 20px;
}
.contact-image {
margin-top: 0;
margin-left: 20px;
order: 1; /* Ensures image is on the right side in desktop view */
max-width: 500px; /* Set maximum width for image */
width: auto; /* Ensure image maintains aspect ratio */
}
}
</style>
</head>
<body>
<div class="heading">Contact Us...</div>
<div class="main-container">
<div class="form-and-image-container">
<div class="form-container">
<div class="step-container">
<div class="step-indicator">
<div class="step" id="step-1-indicator">1</div>
</div>
<div class="progress-bar-container">
<div class="progress-bar" id="progressBar"></div>
</div>
<div class="step-indicator">
<div class="step" id="step-2-indicator">2</div>
</div>
</div>
<form id="contactForm" action="https://formspree.io/f/xoqolerl" method="POST">
<!-- Step 1 -->
<div class="form-step active" id="step-1">
<div class="form-group">
<label for="name">Name</label>
<input type="text" id="name" name="name" placeholder="Full Name" required>
<div class="error-message" id="name-error"></div>
</div>
<div class="form-group">
<label for="email">Email</label>
<input type="email" id="email" name="email" placeholder="Email" required>
<div class="error-message" id="email-error"></div>
</div>
<div class="form-group">
<label for="mobile">Mobile</label>
<input type="text" id="mobile" name="mobile" placeholder="Mobile" required>
<div class="error-message" id="mobile-error"></div>
</div>
</div>
<!-- Step 2 -->
<div class="form-step" id="step-2">
<div class="form-group">
<label for="department">Department:</label>
<select id="department" name="department" required>
<option value="">Select Department</option>
<option value="sales">Sales</option>
<option value="support">Support</option>
<option value="general">General Query</option>
</select>
<div class="error-message" id="department-error"></div>
</div>
<div class="form-group">
<label for="website">Your Website URL:</label>
<input type="url" id="website" name="website" placeholder="Your Website URL" required>
<div class="error-message" id="website-error"></div>
</div>
<div class="form-group">
<label for="message">Your Message:</label>
<textarea id="message" name="message" rows="4" placeholder="Your Message" required></textarea>
<div class="error-message" id="message-error"></div>
</div>
</div>
<div class="form-navigation">
<button type="button" class="btn" id="prevBtn" onclick="changeStep(-1)">Previous</button>
<button type="button" class="btn" id="nextBtn" onclick="changeStep(1)">Next</button>
<button type="submit" class="btn" id="submitBtn" style="display:none;">Submit</button>
</div>
</form>
</div>
<img src="https://tutorialtemple.com/wp-content/uploads/2024/08/contact.png" alt="Contact Image" class="contact-image">
</div>
</div>
<!-- Modal -->
<div id="successModal" class="modal">
<div class="modal-content">
<span class="close-button" onclick="closeModal()">×</span>
<p>Thank you for your submission! We will get back to you soon.</p>
</div>
</div>
<script>
let currentStep = 0;
const steps = document.querySelectorAll(".form-step");
const progressBar = document.getElementById("progressBar");
const nextBtn = document.getElementById("nextBtn");
const prevBtn = document.getElementById("prevBtn");
const submitBtn = document.getElementById("submitBtn");
const stepIndicators = document.querySelectorAll(".step");
function updateForm() {
steps.forEach((step, index) => {
step.classList.toggle("active", index === currentStep);
stepIndicators[index].classList.toggle("complete", index <= currentStep); // Update condition here
});
progressBar.style.width = ((currentStep) / (steps.length - 1)) * 100 + "%";
if (currentStep === 0) {
prevBtn.style.display = "none";
nextBtn.style.display = "inline-block";
submitBtn.style.display = "none";
} else if (currentStep === steps.length - 1) {
nextBtn.style.display = "none";
prevBtn.style.display = "inline-block";
submitBtn.style.display = "inline-block";
} else {
prevBtn.style.display = "inline-block";
nextBtn.style.display = "inline-block";
submitBtn.style.display = "none";
}
}
function showStep(stepIndex) {
currentStep = stepIndex;
updateForm();
}
function validateStep(stepIndex) {
let isValid = true;
const currentStepElement = steps[stepIndex];
const inputs = currentStepElement.querySelectorAll('input, select, textarea');
inputs.forEach(input => {
const errorElement = document.getElementById(input.id + '-error');
if (input.required && !input.value && stepIndex === currentStep) {
errorElement.textContent = 'This field is required';
isValid = false;
} else {
errorElement.textContent = '';
}
});
return isValid;
}
nextBtn.addEventListener('click', () => {
if (validateStep(currentStep)) {
showStep(currentStep + 1);
}
});
prevBtn.addEventListener('click', () => {
showStep(currentStep - 1);
});
document.getElementById('contactForm').addEventListener('submit', (event) => {
event.preventDefault();
if (validateStep(currentStep) || currentStep === 1) { // Allow submission on step 2 even if it's blank
const formData = new FormData(event.target);
fetch(event.target.action, {
method: 'POST',
body: formData,
headers: {
'Accept': 'application/json'
}
})
.then(response => {
if (response.ok) {
showSuccessModal();
event.target.reset(); // Optionally reset the form
showStep(0); // Reset to first step
} else {
throw new Error('Form submission failed.');
}
})
.catch(error => {
console.error('Form submission error:', error);
alert('Something went wrong. Please try again.');
});
}
});
function showSuccessModal() {
document.getElementById('successModal').style.display = 'block';
}
document.querySelector('.close-button').addEventListener('click', () => {
document.getElementById('successModal').style.display = 'none';
});
window.addEventListener('click', (event) => {
if (event.target === document.getElementById('successModal')) {
document.getElementById('successModal').style.display = 'none';
}
});
// Initialize form state on page load
updateForm();
</script>
</body>
</html>➤To use Formspree, you need to replace the placeholder https://formspree.io/f/xoqolerl with your own Formspree endpoint URL. Here’s how you can do it:
- Get Your Formspree Endpoint:
- Go to Formspree.
- Create an account or log in.
- Create a new form to get your endpoint URL.
- Replace the Endpoint in Your HTML:
- In your form’s “HTML” code, find the
actionattribute in the “<form>” tag. - Replace the existing URL with your Formspree endpoint URL.
- In your form’s “HTML” code, find the
➤After replacing the Formspree endpoint in your HTML code, follow these steps:
➤Save Your Changes
📝Conclusion
In this guide, you have learned how to create a multi-step contact form using HTML and JavaScript, integrate it with Formspree for email submissions, and customize its appearance for both desktop and mobile views. Here’s a brief summary of the key steps and tips:
- Form Creation:
- You built a multi-step form with two steps: the first for personal details and the second for additional information.
- The form includes validation to ensure all required fields are filled before progressing to the next step.
- Form Styling:
- CSS was used to style the form and its components, ensuring it is responsive and visually appealing on both desktop and mobile devices.
- You applied custom styles for step indicators, progress bars, and form navigation buttons.
- Integration with Formspree:
- You replaced the placeholder Formspree endpoint in your HTML code with your actual Formspree endpoint.
- After updating the endpoint, you saved your changes and tested the form to ensure it correctly submits data to Formspree.
- Testing and Validation:
- You tested the form to check its functionality, including validation, submission, and the display of the success modal.
- Ensure to verify form submissions in your Formspree account and check for any issues in the form’s behavior or appearance.
- Troubleshooting:
- If you encounter any issues, verify that the Formspree endpoint is correctly set, check for JavaScript errors, and ensure CSS is applied correctly.
📌By following these steps, you can successfully implement a multi-step contact form on your website, enhancing user experience and efficiently handling contact submissions. If you have any more questions or need further assistance, feel free to ask!


